Our passion for traveling and the ambition to share travel happiness are at the heart and soul of our identity. It is the guideline in everything we do and communicate. There is no better way to do this than to link our travelers with tour operators world-wide.
We are happy you share this idea!
Let’s start sharing our passion and set-up your tours
Index
Log-in to your dashboard
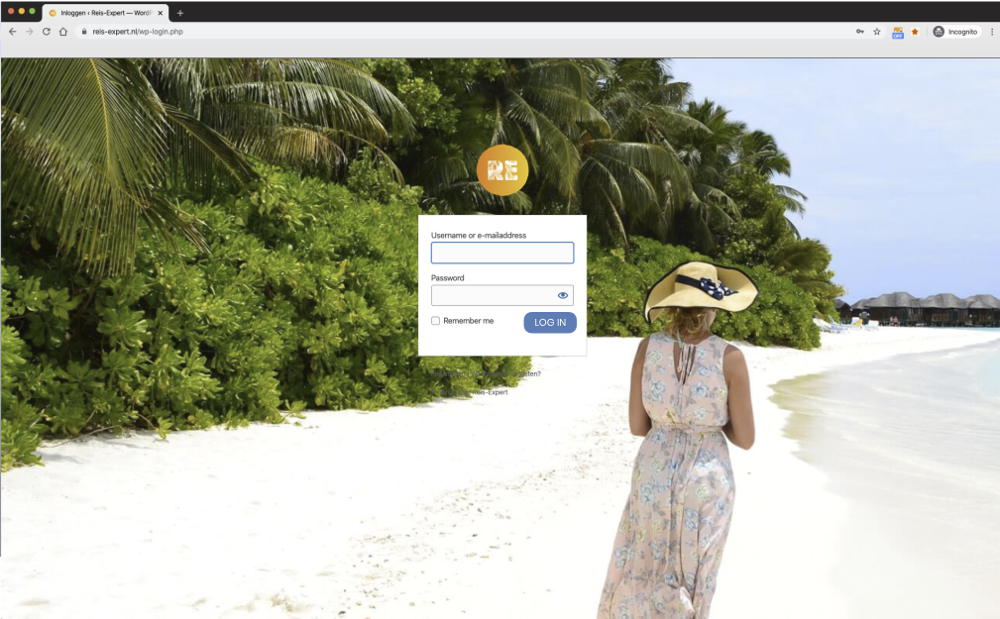
Open your internet browser and surf to this page (www.reis-expert.nl/wp-admin/) to log in. You will also find this link in the e-mail you receive once your registration has been completed and approved. You will find a log-in screen.
Please fill in the chosen Username and Password.
Introduction to your dashboard
Your dashboard is the first thing you’ll see after logging in. This dashboard will show all information you need like net sales, commissions, top sold tours, all sold tours and recent bookings.
On the left you find the menu (which is foldable). You can select the following options:
We start with the most important thing: setting up your Profile, Store Settings and Products.
1. Setting up your profile
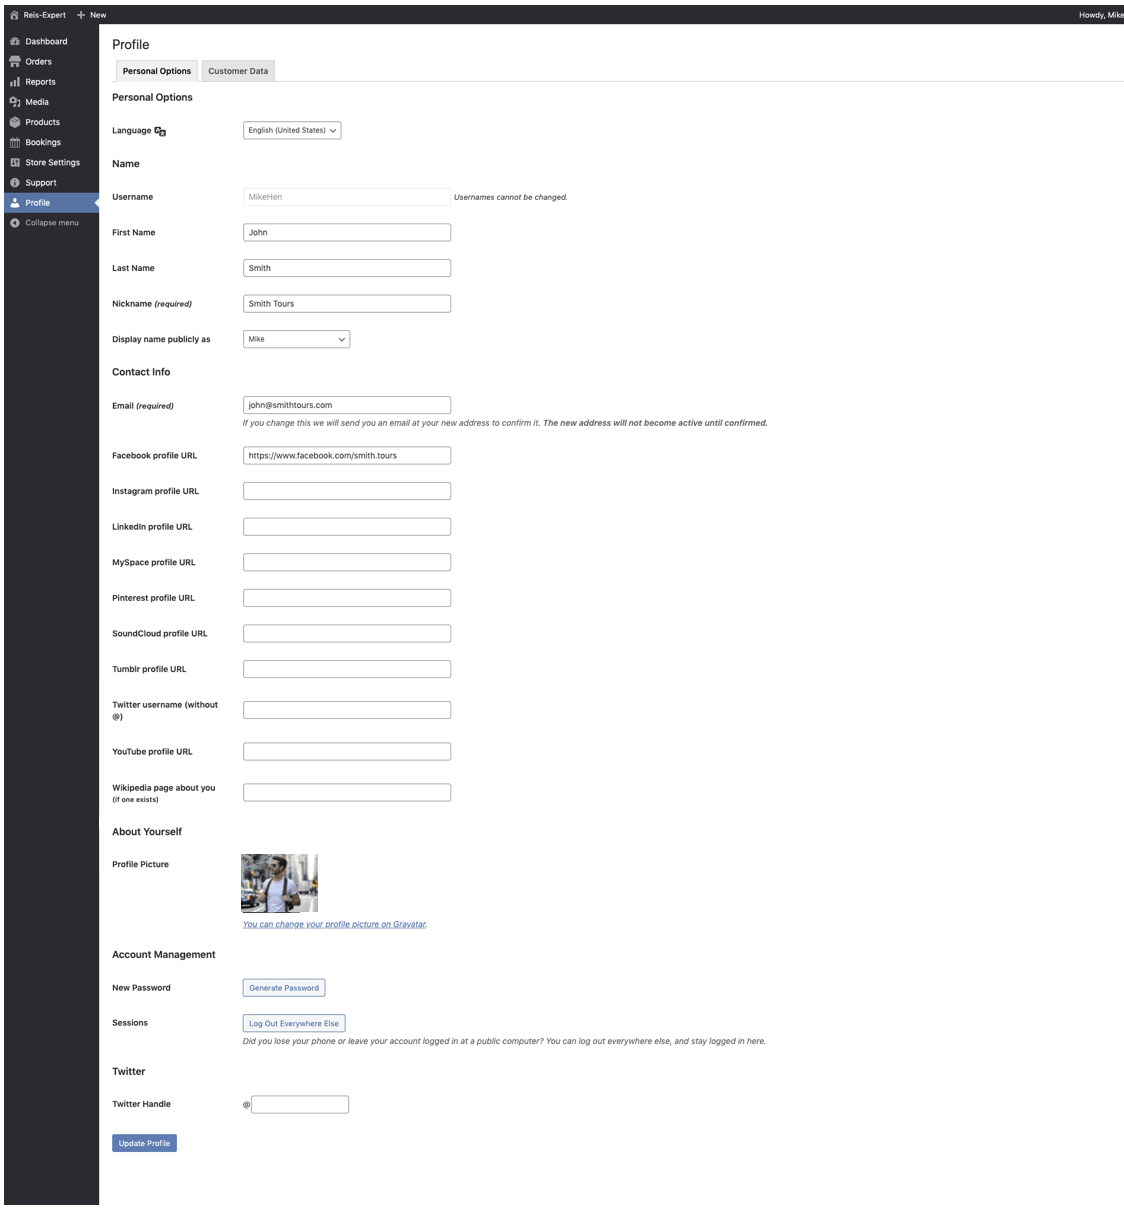
Setting up your profile is the first thing to do. Completing your profile is required because we like to know who we work with. None of this information will be displayed on our website, but this may change in the future.
A short manual to complete your profile:
- Set your language to English. If you don’t, all your settings will be in Dutch;
- Fill in your first name, last name and nickname;
- You can NOT change your company name you give yourself when you register so please select this wisely;
- Please update contact information. If you don’t use any of the given Social Media platforms, please leave this empty;
- Choose a profile picture. This will not be shown on the website but only on the top right. This is your dashboard photo. You can upload your company logo at Store Settings.
- Choose a password (or change it).
2. Setting up Store Settings
You Company Profile is the information that will be shown on the website. This will be shown on the website. Our customers can visit your personal Tour Operator Page. If you share more information share about yourself or you company, the more likely travelers will be to book a tour.
A short manual to complete your profile:
- Select a logo (ideal size 300×300 px). This logo will be shown on your personal Tour Operator Page;
- Tell something about your company. Why should travelers book with you, what kind of tours do you offer, do you have English speaking guides etc.;
- Your contact e-mail address where travelers with questions can reach you;
- Your PayPal account e-mail. This is important because we transfer the money to this account;
- This is a fixed fee and not adjustable.
- Set timezone. If you don’t the purchase time of the tour will be the Dutch timezone which can be confusing.
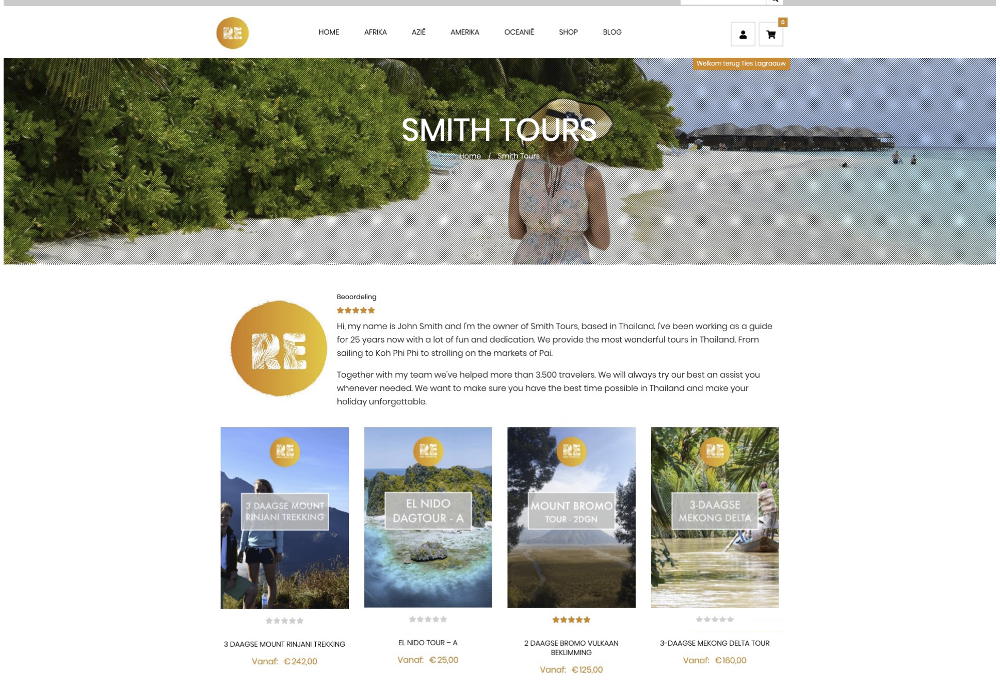
This information will be shown on your personal Tour Operator Page where travelers can also see all tours you have to offer. See the example beneath.
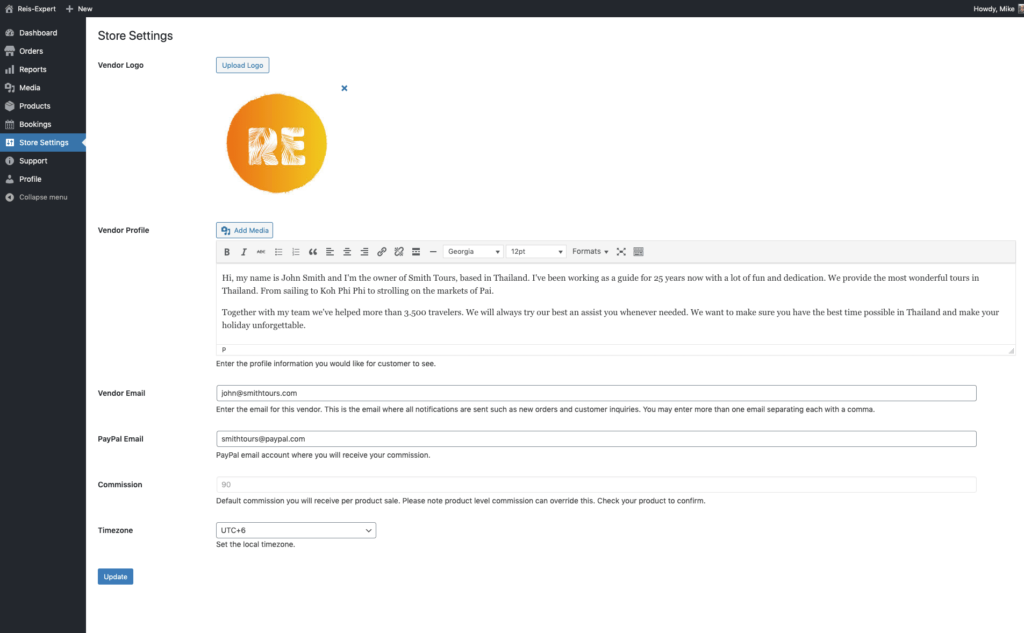 Overview of Store Settings
3. Add your tours
It’s all about introducing (and selling) your tours though our website. In order to do that you have to add your tours which is not that hard. Please follow the steps below.
Add a new tour by simply going to ‘Products‘ in the left menu and click on ‘Add New‘. You can also add a new tour by clicking on ‘+ New‘ in the black top bar and select ‘Product‘. Either way is fine.
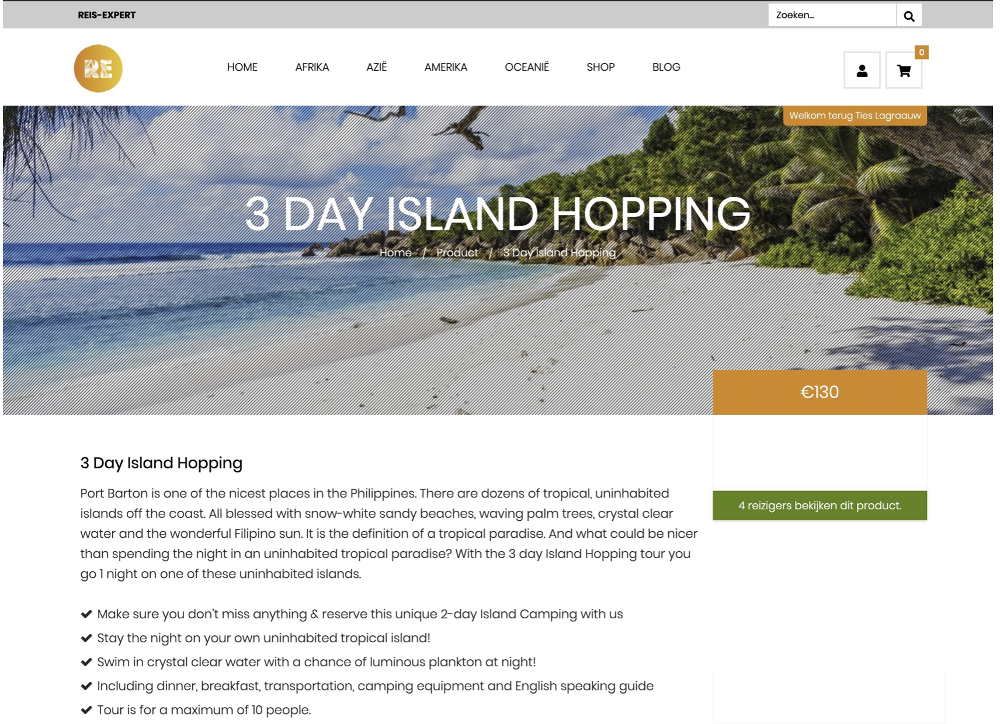
Adding a new tour
From here we will work our way down to finally submitting your tour for a review by one of our travel experts.
We will guide you trough adding a new tour by the following 10 Steps.
- Tour title
- Header image
- Tour price
- Short description
- Product data
- Tabs
- Save tour
- Preview tour
- Add tags
- Submit for review
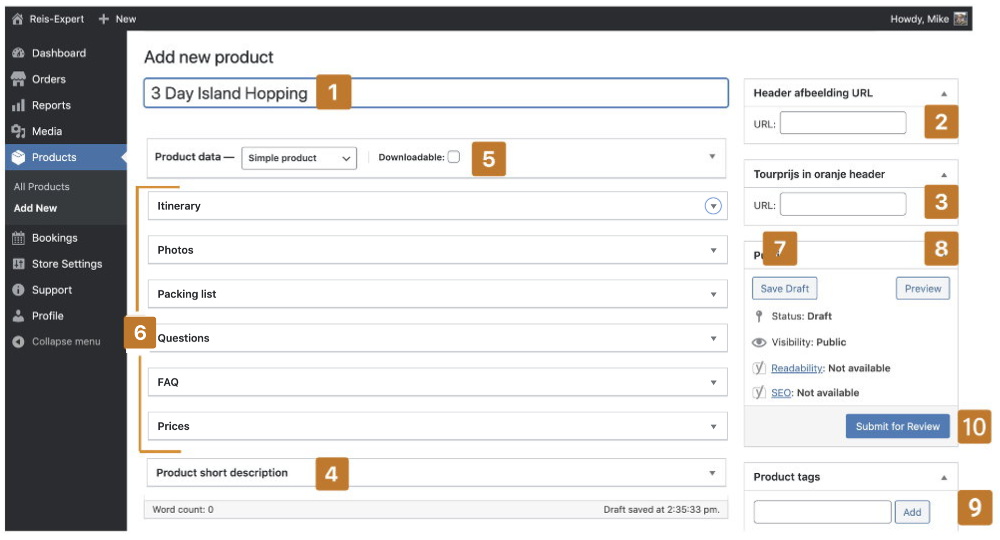 It’s just 10 steps to add your tour
3.1 Choosing a title for your tour
The first step is to choose the right title for your tour. Keep the title short and powerful. Choose a good title because customers are more likely to click on your tour. Try to keep it short as too long titles will be confusing and lead to less sales.
3.2 Select a photo for the header
The header is the main photo travelers see when the click on your tour. This must be a good photo because good photo’s boost the conversion. Add a photo by opening ‘Media’ in new tab in your browser.
Click on ‘Add New‘ and select a photo from your device. Once you’ve uploaded the photo click on the photo in the media grid. It opens the photo. Copy the link as indicated with the arrow.

Paste this link in the field ‘Header Image Link‘.
3.3 The price of the tour
Once you have done this please fill in the price of the tour. Since all our visitors live in Holland or Belgium it is important to set your prices in EURO and not in Dollars. You can add your price at the field ‘Tour price in Orange Header‘
Save your settings and preview
It is important to save your tour. Click on ‘Save Draft’ so you will not lose the settings.
Our system has an auto-save mode that automatically saves what you do but it’s always better so click on ‘Save Draft’ every now and then by yourself.
By clicking on ‘Preview‘ you can see what your tour looks like so far on the the website.
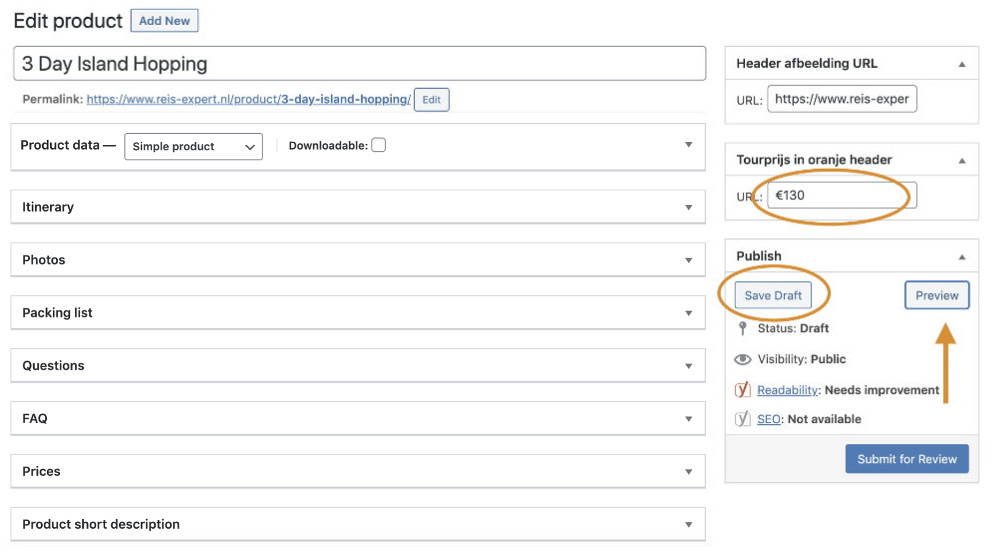
Back-end editor
 This is what you see when you click on Preview.
Please keep in mind that our website is in Dutch so most terms you’ll see are in Dutch. This can not be changed.
3.4 Short description
It’s time to tell something about the tour. Travelers want to know what they will be doing and what the tour is all about. Keep in mind that this is a short description. The full description will come later.
Next to the short description it’s import to list the most important highlights.
It’s easy to set it up.
Scroll down to the tab ‘Product Short Description’ and unfold the tab. It’s works the same like a simple text editor or Word. Write a short description, hit enter and list the most important highlights of the tour.
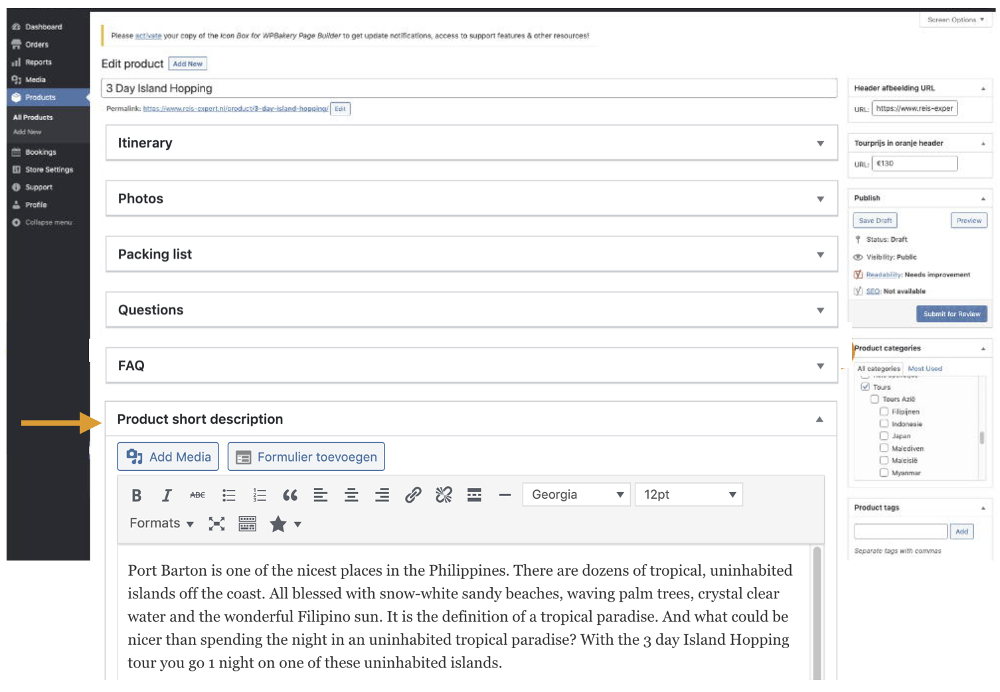
Once you’ve made a short description click on preview to see how it looks and adjust if necessary.
3.5 Tour Data
It’s time to set all the data for your tour. This is the most important part of adding your tour. This is where you define the price, the availability, different type of persons etc. We will guide you trough the process.
In this example we will add a fairly simple tour which has 1 price per person and is NOT available from december to February (such as a rain season). Follow these steps;
3.5.1 General
This is where you define the general information of your tour.
- Make the product a ‘Bookable Product‘
- Check ‘Virtual” and ‘Has Persons‘
- Tax Status is ‘None‘. Tax Class is ‘Nultarief‘
- Commission is always preset
- Leave ‘Product Vendors‘ and ‘Tax Handling‘ as it is
- Booking duration is the total time of the tour. In this example it’s 3 days.
- Set calendar to ‘Display calendar on click’
- If you check approval, customers can only inquire a booking. For example if you always need to check availability. ATTENTION: this means that the tour is NOT bookable. In the example we leave it unchecked
- Check this field and select the timeframe customers are still able to cancel the tour without consequences.
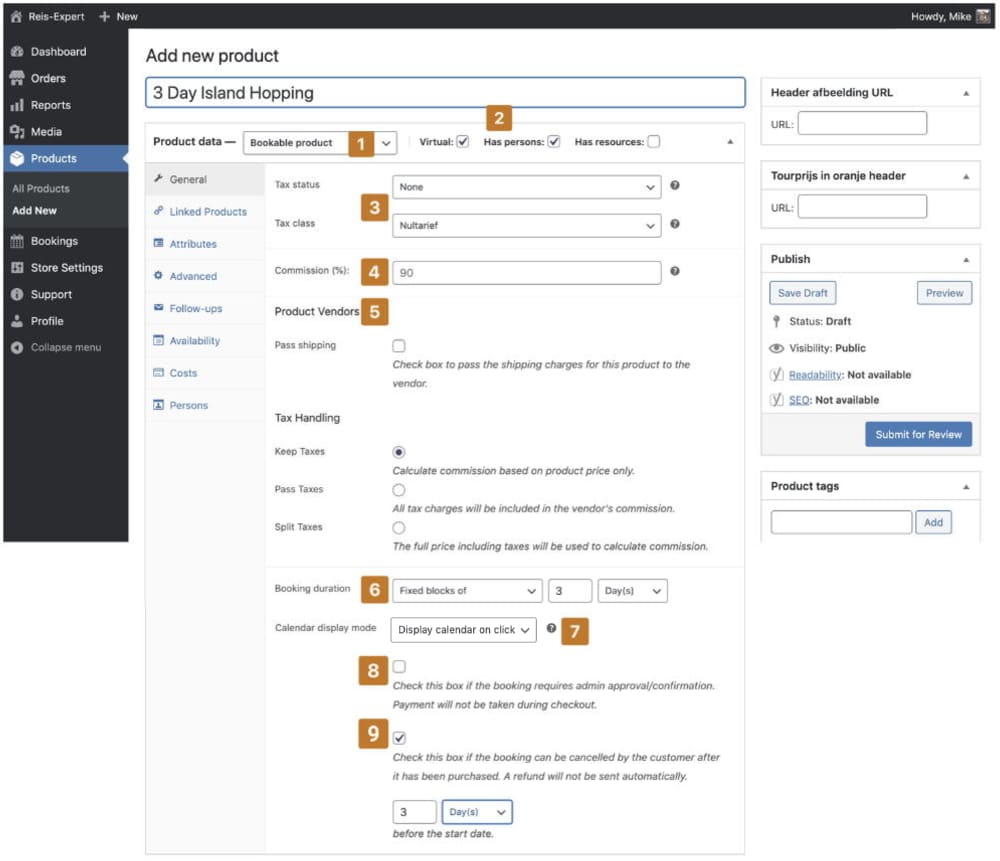 General information
3.5.2 Availability
At availability you can exclude certain days of blocks. Follow these steps;
- ‘Max bookings per block‘ defines the total amount of people that can join 1 tour. For example, if you have a boat for 5 persons this number must be 5
- ‘Minimum block bookable‘ defines the minimum timeframe between booking date and start date of the tour
- ‘Maximum block bookable‘ defines timeframe the tour is available in the future.
- ‘Buffer period‘ leave as it is
- ‘All dates are‘ always available. If you change this, tours can not be booked
- ‘Check rules against‘ leave as it is
- Select ‘Restrict selectable days‘ if the tour is not available on specific days (for example weekends)
- Add Range if the tour is available or not, on specific times (months, weeks, days etc.)
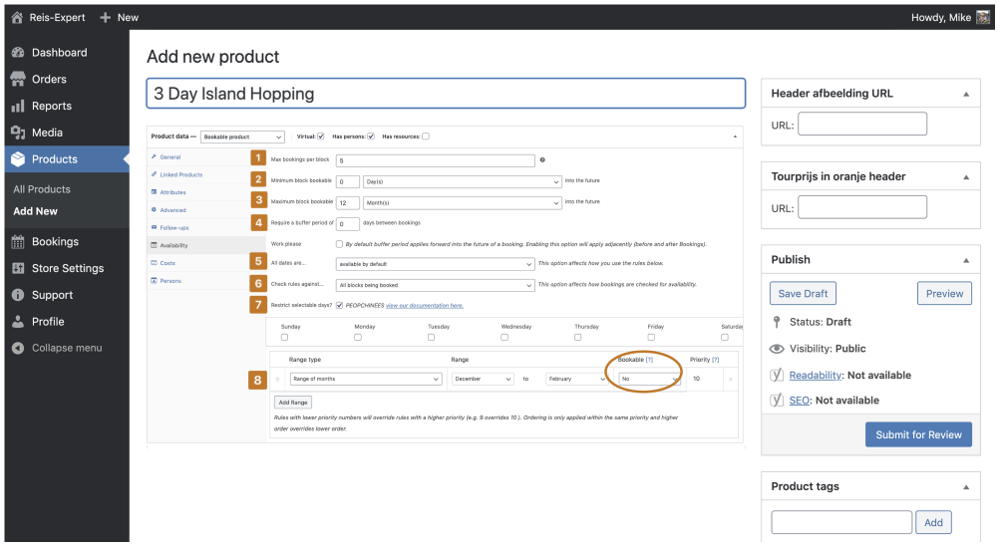
Availability
3.5.3 Costs
This is where you define the price of the tour which our website will calculate to the customer automatically. Follow these steps;
- ‘Base Cost‘ defines the cost for every person who wants to book the tour. In this example it’s €150 p.p.
- NOTE: if you have different person types, please follow to 3.5.4
- ‘Block Cost‘ only needs to be adjusted if you define blocks. We don’t use it in this example
- ‘Display Cost‘ is the price our website shows in the tour overview page. If you leave it empty it will show the Base Cost so it’s best to leave it empty
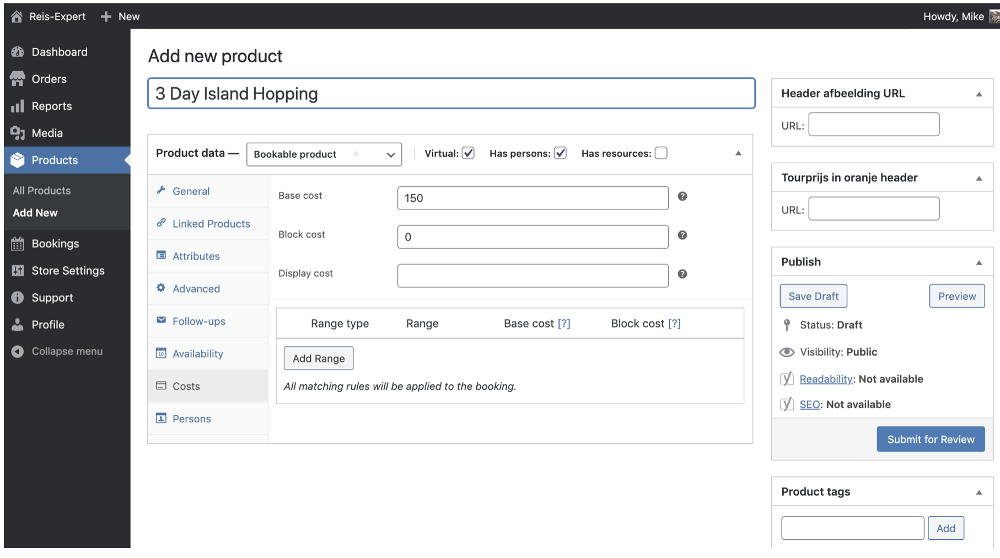
The tour is now €150 p.p.
There is an extra option by adding a range. Here you can specify special prices per group of persons. For example if the price is different for 1 person, 2 persons or 5-10 persons etc. See the example.
You can use these symbols
- = changes base cost to certain amount
- + base cost + certain amount
- – base cost – certain amount
- x base cost X certain amount
- ÷ base cost ÷ certain amount

In this case 1 person will pay €160 p.p. and 2 tot 10 persons pay €150 p.p.
You can also define a price per timeframe. For example if the tour is more expensive in January or Friday to Sunday (weekend). See the example.

In this case the price will be €180 p.p from Friday to Sunday.
3.5.4 Persons
The last step is to define the persons. Here you can set the minimum and maximum amount of persons that can join the tour. You can also define a price per person type (adults or children). Follow these steps.
- Set the minimum amount of persons needed for the tour
- Set the maximum amount of persons needed for the tour
- Check the ‘Multiply all costs by person count‘. This will make sure the price is always correct if there’s more than 1 person

In this example the minimum persons needed for this tour is 1. Maximum is 5
If you have different prices for Adults or Children you can check ‘Enable person types‘. Here you can define the price per type of person. See the example.
NOTE: if you have different prices for Adults or Children don’t forget to uncheck Multiply all costs by person count.
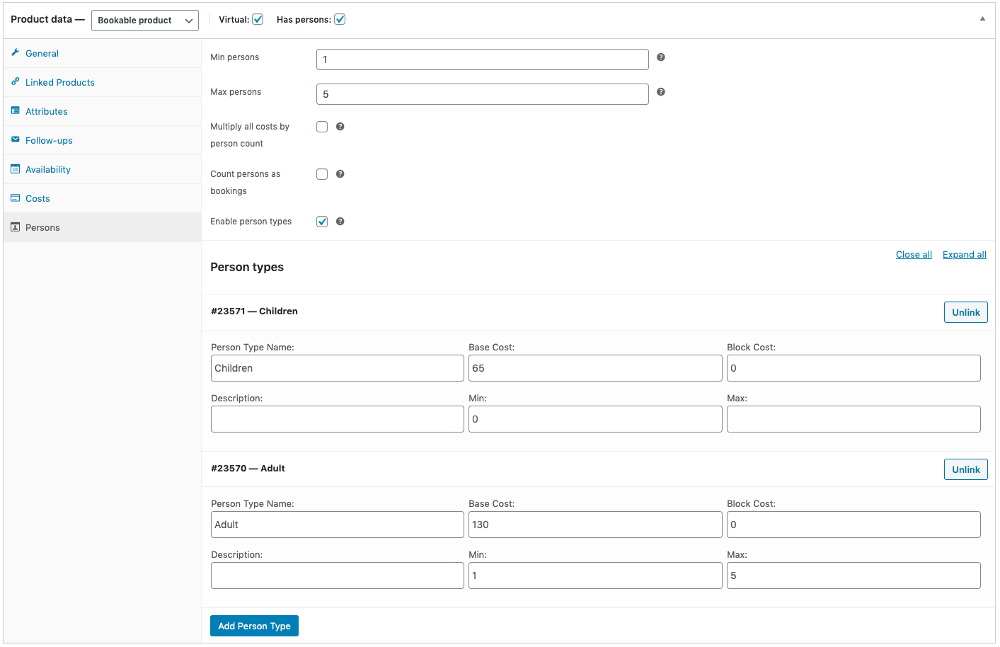
In this example the price for adults is €130 with a minimum of 1 and maximum 5 adults. The price for children is €65 and there is no minimum or maximum defined.
3.6 Tabs
At ‘Tabs‘ you can add extra information for the customer. Tabs work the same as a text editor or Word. Click on the ↓ to unfold the field you want to adjust. There are 6 tabs that you can include in the product information:
- Itinerary
- Photos
- Prices
- FAQ
- Packing list
- Questions (leave empty)
Please complete all tabs as accurate as possible. Remember, the better the information, the easier it is for customers to book the tour. Once you’ve filled in all information click on ‘Preview‘ to see the tabs and adjust if necessary.
Click on ‘save‘ to save.

How you see it
3.7 / 3.8 Preview and Save
We’ve already discussed this but in the process you can save your tour now and then. Our system has an auto-save, but better safe then sorry!
By clicking on ‘preview‘ you can see what your tour looks like on our website so you can adjust when necessary.
3.9 Product Tags
It’s important to set your product tags. Tags indicates where the tour is. For example, Manilla and Philippines. By giving tags, the website automatically places the tour in the right category.
So if customers filter on the Philippines it shows tours with the tag Philippines.
3.10 Submit for review
The last step is to submit the tour for review. By clicking on this button you will send a notification to us. We will check your tour and adjust if necessary.
When we approve, you will be notified and the tour will be online.
4. Dashboard
Your Dashboard is the overview page of your account. Here you can see the Sales Summary. This will show the details of your total sales.
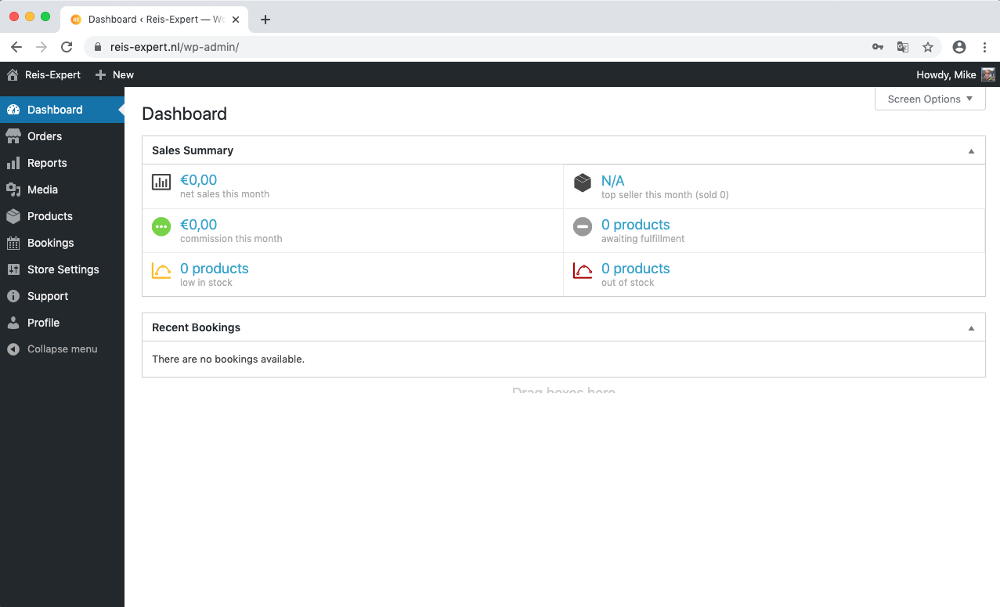 Your dashboard
5. Orders
Here you find all your orders. You can click on the order number to see the details like customer info, commission status (paid or not paid). You can also change Fulfillment Status from ‘UNFULFILLED’ to ‘FULFILLED’ if customer successfully finished the tour.
6. Reports
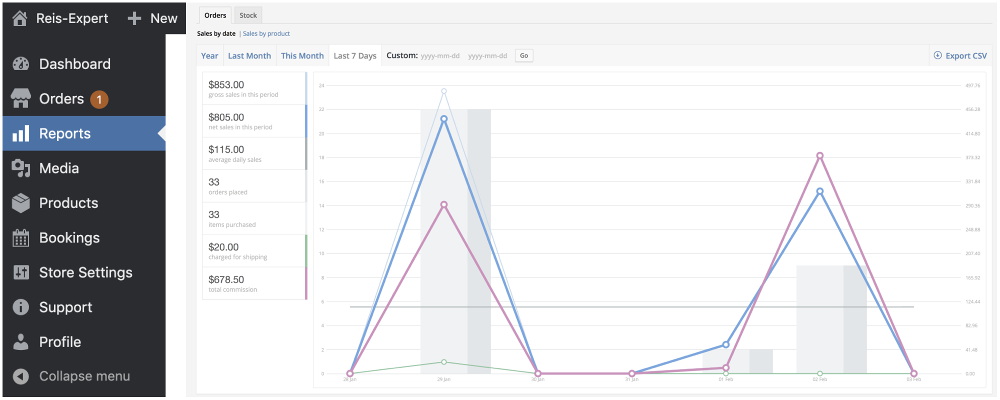
At Reports you can see all information about the sold tours in the last year, month, 7 days etc. You find the gross and net sales and also your total amount earned.
7. Media
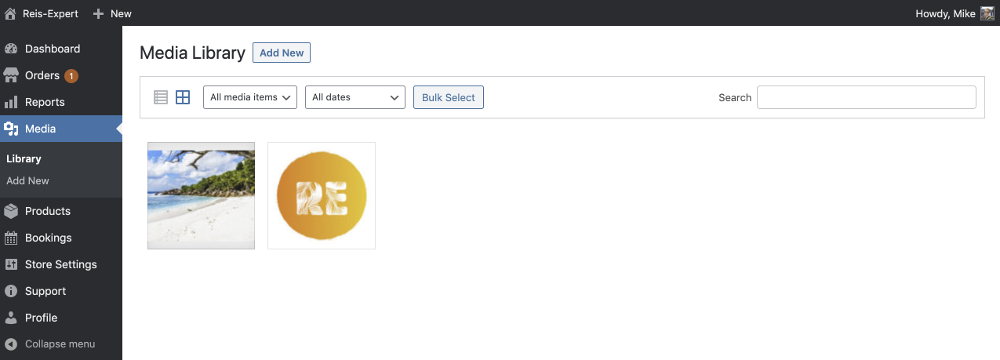
At Media you find all your uploaded photo’s. You can also add PDF files if necessary. Adding photo’s is simple. Just click ‘Add New’ and upload your photo.
Please keep in mind that there is a maximum size for the photo’s. Please resize the photo’s if they exceed 500 KB. The bigger the photo’s, the slower your page will be.
8. Bookings
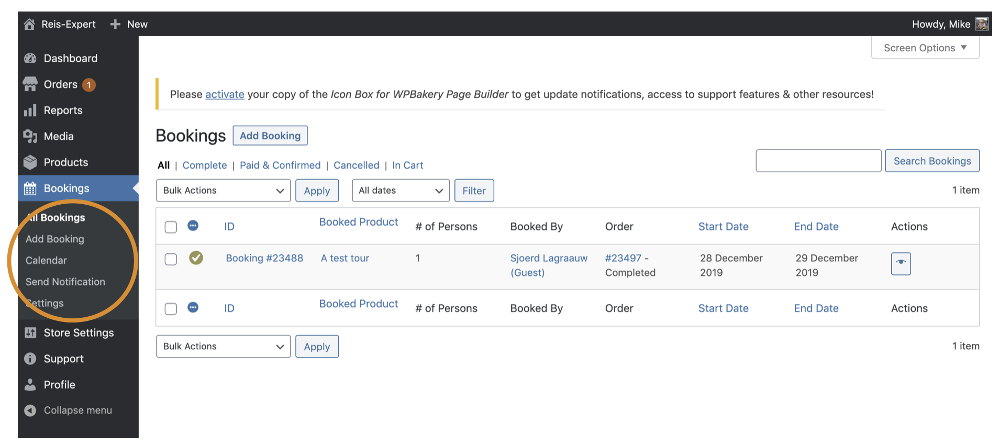
At Bookings you find a detailed overview of the tours that has been finished or that are yet to come. You can also view the bookings in your own calendar per day, week or month which makes it easier to see which bookings are still to come.
9. Support
If you have questions about your account or a booking you can ask your question here and we will answer as soon as possible.
With this manual you should be able to set up your profile and add your own tours. If you have any questions please do not hesitate and contact us at booking(@)reis-expert.nl.



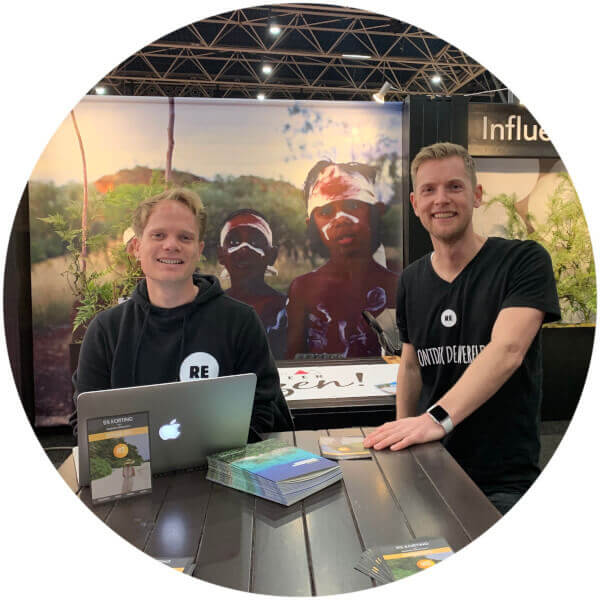 Wie had gedacht dat ons leven in 2009 zo drastisch zou veranderen. Het was 2009 toen wij voor het eerst een verre reis maakte. We zaten ‘vast’ in de sleur van het dagelijkse leven en waren op zoek naar nieuwe uitdagingen, een nieuw avontuur. We besloten onze baan op te zeggen om de reis van ons leven te maken…